




Canada Visa Rejection can happen for many reasons including incomplete documents, no proof of funds, wrong information, or not meeting visa requirements. Being aware of these common problems may help applicants identify possible concerns and prepare a stronger application.
This guide covers the most common Canada visa rejection reasons, how to avoid them and what to do if your application is refused. It also explains the key steps to consider before reapplying for a job.
Table Of Content
1Introduction2Canada Visa Rejection Reasons3Canada Visa Rejection Rate for Indians4How to Avoid Canada Visa Rejection?5How to apply for Canada Visa after Rejection6Conclusion7FAQs
Canada Visa Rejection Reasons
The most common Canada visa rejection reasons include insufficient financial proof, incomplete documents, unclear travel or study plans, weak ties to the home country, and failure to meet the requirements of the selected visa category are among them. Also previous immigration violations, misrepresentation, and concerns about the applicant’s intention to leave Canada can also result in a refusal.
Applicants researching the Canada visa rejection rate by country should note that refusal rates can vary by visa category and reporting period. IRCC’s published 2025 figure was a global temporary resident visa refusal rate of 51%; this figure is not a country-specific rate.
1. The Officer is Not Satisfied that you will Leave Canada
For a temporary resident visa, the applicant must be able to convince the officer that they will leave Canada at the end of their authorized stay. IRCC looks at such factors as the applicant’s ties to their home country, such as employment, home, financial assets or family connections.
Thus, the application may be rejected if the information provided does not sufficiently reflect the applicant’s intention to return after the temporary stay.
2. Insufficient Funds for the Proposed Stay
Applicants must prove that they have sufficient funds to support themselves and their family members during their stay in Canada and to return home. The required amount may depend on the length of stay and whether the applicant will be staying in a hotel or with friends or relatives. The financial information provided should therefore support the proposed trip and the applicant’s circumstances.
3. The Purpose of the Visit is Not Sufficiently Supported
Applicants must provide information on the purpose and details of the visit. IRCC’s visitor visa application materials ask applicants to provide the purpose of their visit, dates of stay planned, available funds and information about the people or institutions they plan to visit.
Where the information provided is not sufficient to establish the proposed temporary stay, the officer may not be satisfied that the applicant meets the requirements.
4. Inadmissibility to Canada
A visa may be denied to an applicant if they are found to be inadmissible to Canada. IRCC has identified several potential grounds of inadmissibility, Depending on the application type, applicants may need to complete a Canada Immigration Medical Exam to determine whether they meet Canada’s medical admissibility requirements. including:
- Security reasons
- Human or international rights violations
- Criminality
- Organised crime
- Medical reasons
- Financial reasons
- Misrepresentation
- Failure to comply with the Immigration and Refugee Protection Act
- Having an inadmissible family member
The applicable rules depend on the individual’s circumstances and the specific ground of inadmissibility.
5. Misrepresentation or Providing False Information
Providing false information or failing to provide information relevant to an immigration decision may result in a finding of misrepresentation. Misrepresentation is one of the reasons IRCC may determine a person is inadmissible to Canada.
Applicants should ensure that the information and documents submitted are accurate, complete and consistent with their circumstances.
6. Previous Immigration Non-Compliance
A history of not meeting Canadian immigration requirements can also raise concerns. IRCC provides examples such as a temporary resident who stays longer than authorized or works or studies without the required authorization.
Previous immigration history can therefore be relevant when an officer assesses a new application.
7. Criminal, Security or Other Admissibility Concerns
Canada’s immigration rules include specific admissibility requirements relating to criminality, security, human rights and organised crime. An applicant who is found inadmissible on one of these grounds may be refused a visa or denied entry to Canada.
Canada Visa Rejection Rate for Indians
There is no single fixed Canada visa rejection rate for Indian applicants, as refusal rates vary by visa type, application year and eligibility factors.
In 2025, Canada’s global refusal rate for new study permit applications was 59%, meaning approximately 41% of applications were approved. However, this figure applies to applicants worldwide, not specifically to Indian applicants or all Canadian visa categories.
The outcome of a Canada visa application depends on factors such as financial capacity, purpose of travel, supporting documents, eligibility and the applicant’s circumstances. A refusal does not necessarily prevent an applicant from applying again, but the reasons for the previous refusal should be addressed before submitting a new application.
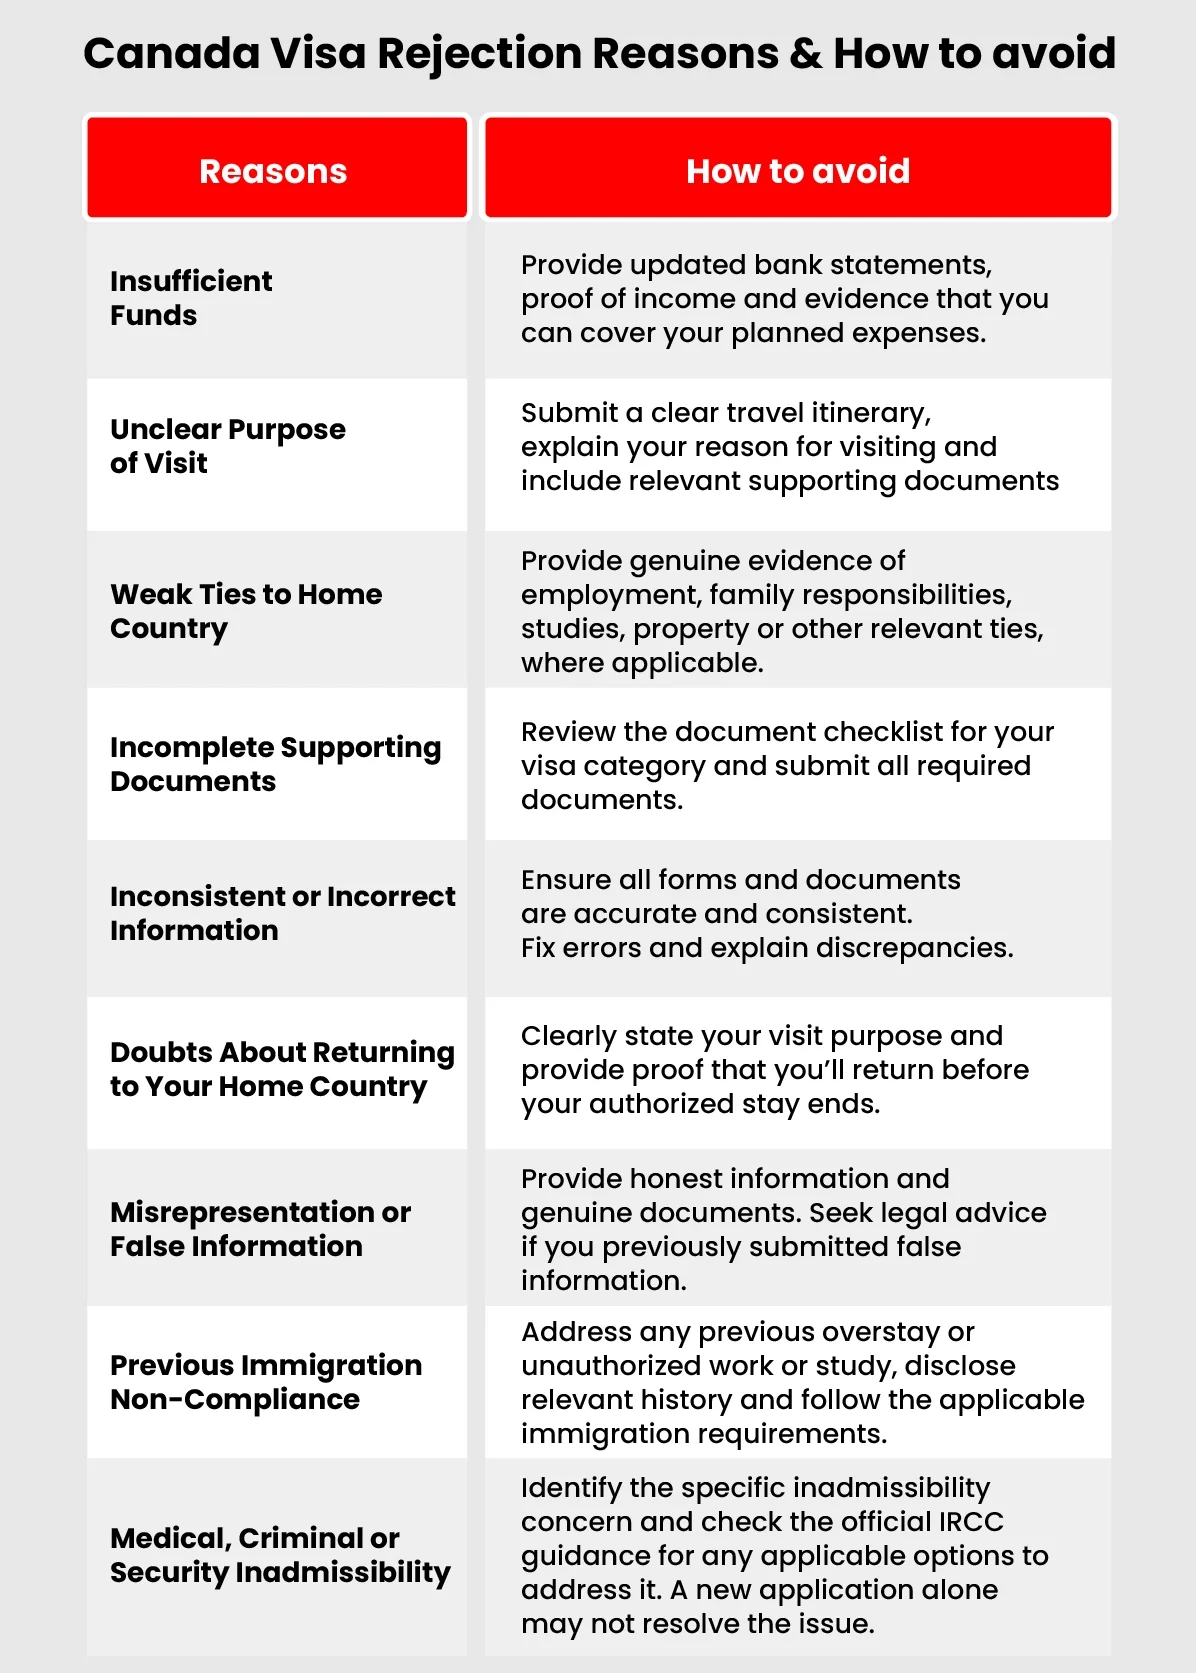
How to Avoid Canada Visa Rejection?
To avoid Canada visa rejection, applicants should submit complete and accurate documents, demonstrate sufficient funds, clearly explain their purpose of travel, and ensure their information meets the requirements of the chosen visa category. For visitor visas, applicants must also show that they will leave Canada at the end of their authorized stay.
Although visa approval cannot be guaranteed, understanding the requirements and providing consistent, genuine information can help reduce the risk of refusal.
Here are the key steps to Avoid Canada Visa Rejection:
1. Check the Requirements Carefully
Before applying, review the eligibility criteria and document requirements for the specific Canada visa or permit. Applicants must answer the questions on their application and provide the documents requested by IRCC for their situation. Incomplete applications may be returned or rejected.
2. Provide Relevant Supporting Documents
To reduce the risk of Canada Visa Rejection, applicants should meet the relevant requirements and submit complete, accurate supporting documents.
3. Keep Your Information Accurate and Consistent
Ensure that the information you give in your application and supporting documents is complete and accurate. IRCC notes that providing false or misleading information can result in serious consequences, including refusal and inadmissibility in applicable cases.
4. Be Clear About Your Plans
Explain the purpose of your visit and provide information to support your proposed stay for a visitor visa. IRCC requires applicants to convince an immigration officer that they will leave Canada at the end of their visit.
5. Be Honest and Accurate
Provide truthful information and genuine documents throughout the application. IRCC states that false or misleading information can lead to immigration consequences.
6. Review Your Application Before Submission
Before submitting, check that you have answered all required questions and included the documents requested for your application. IRCC states that incomplete applications may be returned or refused.
How to apply for Canada Visa after Rejection
Step 1: Read Your Refusal Letter Carefully
Carefully review your Canada visa rejection letter to understand why your application was refused. Also check any officer decision notes provided by IRCC, which may explain the reasons for the decision in greater detail.
Since 2025, IRCC has been providing officer decision notes with most temporary residence refusals, including visitor, study and work permit applications. From May 26, 2026, this also applies to most permanent residence refusals.
Step 2: Identify and Address the Refusal Reasons
Review the concerns raised by the immigration officer and determine what evidence or changes could address them.
For example:
- Financial concerns: Provide relevant, updated financial evidence and explain the source of funds where necessary.
- Purpose of travel: Submit a clear itinerary, invitation or other relevant supporting evidence.
- Ties to your home country: Provide evidence of employment, studies, family responsibilities or other relevant commitments, where applicable.
- Incomplete or inconsistent information: Correct errors and provide the required documents.
These are examples, not a universal checklist. The documents you need depend on the refusal reasons and your visa category.
Step 3: Prepare a Stronger Application
Gather updated documents and any new evidence that directly addresses the officer’s concerns. Make sure your application forms and your supporting documents and explanations are accurate and consistent.
If nothing has changed in your circumstances and there is no new evidence, resubmitting the same application may result in a further refusal.
Step 4: Write an Explanation Letter, if appropriate
You can include a letter explaining how you have addressed the previous refusal reasons. Identify the concerns raised in the refusal letter and refer to the relevant new or updated evidence.
Important: An explanation letter is supporting evidence, not a guarantee of approval. IRCC’s general guidance does not make a separate explanation letter mandatory in every reapplication.
Step 5: Submit a New Application through the Appropriate Channel
Follow the official instructions for your visa or immigration program. Complete the relevant forms, upload the required supporting documents and pay the applicable fees.
For a visitor visa, use the official IRCC visitor visa application page. Study permits, work permits and permanent residence applications have their own procedures.
Step 6: Complete Biometrics or Other Requested Steps
Review the Canada Biometric Requirements and follow IRCC instructions to provide fingerprints and a photo if required. Check whether your previous biometrics are still valid or whether you need to provide them again.
Step 7: Track Your Application and Wait for a Decision
Check your IRCC account or the relevant application status service for updates. IRCC will communicate its decision and any further instructions through the appropriate channel.
Conclusion
A Canada Visa Rejection does not always mean the end of your plans to visit, study, work or settle in Canada. The key is to understand why your application was refused and take the right steps before applying again. Review your refusal letter, address the officer’s concerns and provide accurate, relevant supporting documents. Before reapplying, check the official IRCC guidance on what to do after a visa refusal to understand your options. A well-prepared application can help you address previous gaps, although approval is never guaranteed.